Sunday, February 24, 2013

What I wore yesterday


DH and I had some grocery shopping to do yesterday; plus some other running around to various clothing/department stores.  The weather was improved over the past few weeks of truly cold weather.  I decided to wear my new KS Jacket (3827).  DH took some photos for me.
Front view. I love the collar.

Back view, wore with jeans.
Side view
This was perfect weight jacket to wear as the temperatures rose to about 60 degrees.  Loved it.

Testing was a good thing

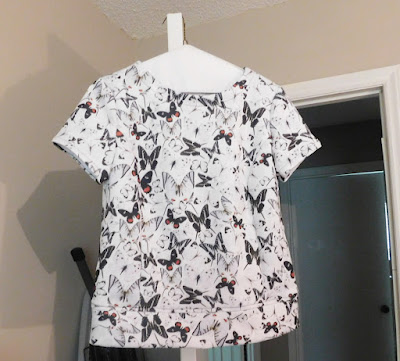
Here is my test garment.  It was too tight through waist and hips.  Shoulder to underarm area was too long.  Neckline a little low before adding the neckband which I did not do as there were enough fitting adjustments needed for the bodice and sleeves.


The length of this top was too long even if I was going to wear it as a tunic and evening then it was just too tight to go over jeans well.

I really like the look of the ruffled sleeve and this was a little fiddly step.   Slow sewing was necessary so the gathers are sewn well.


The adjustments I ended up making before I cut out the originally planned fabric were:

  1. Raise neckline an inch.  This created a challenge to raise the sleeve top by the same inch but it came out well.
  2. Cut off two inches from the length.
  3. Take a 3/8 horizontal tuck in the front and back bodice pieces and adjust sleeve by the same amount.
  4. Add 1/2 inches to front and back from under the bust, which fit well, to the bottom.
  5. Make my usual swayback adjustment which I failed to do when cutting out the test garment.
  6. Adjust markings on the sleeves to allow for added inch at the shoulder point area for front and back so gathers will be sewn appropriately.
The fabric for the "real" top has been cut out and partially sewn.  I had some other things I had to work on around the house so sewing stopped there for the time being.

I hope your sewing weekend was a good one.

Saturday, February 23, 2013

Burda Style top pattern

I decided I wanted to test this pattern on another knit before cutting into the originally planned fabric.  If there are any fitting issues I can adjust after making this one.  This is a knit fabric I used recently to make another top.  It is knit from Gorgeous Fabrics acquired a couple of years ago and strangely I have no photo of it or a recent top I made (or that I can find).

It has a diagonal ombre type coloring in a light rust to brown coloring.  It never became a skirt I had planned to make.  It still could become a skirt as I bought enough fabric that I got one top made and this one to be made and still have enough to make a simple skirt, perhaps a Magic Skirt.

I made a FBA and kept the dart.  Testing this will allow me to decide whether to redraft the front and eliminate dart on the next version.  In tissue fitting this, with some difficulty, I don't think the top will be too low.  Burda tops and I do not always match up.

I also recently ordered some new fabrics which arrived earlier this week.  I am going on a fabric diet now as I am running out of bins to store more fabric. (Sure I can buy more bins, but enough for now and for patterns also)  Will share photos of the new fabric soon.  They are for transitioning to spring which can't get here fast enough.

Tuesday, February 19, 2013

Sewintists Map


This is a really cool idea!  I just visited Kadiddlehopper blog and saw her post about the sewintist map that Vicki with Another Sewing Scientist created.  It is truly a cool idea.    Check it out.


Sunday, February 17, 2013

What's next-Burda top

I stopped my Burda subscription a couple of years ago.  I have purchased various Burda patterns at JoAnn's and on occasion I have downloaded for free or price a few Burda patterns.

I decided to buy the pattern shown in the right side bar after seeing several versions of this made on several blogs.  I really like the gathered sleeves and hope it works out well for me.  I downloaded and printed the pattern pieces; then traced them on to Swedish sewing paper.  I used my Dritz dual tracing wheel and marking paper to create the seam allowances.


I created a FBA based on flat measuring the pattern and deciding I needed to make my usual adjustments.
I still need to make a swayback adjustment.

I am going to use some knit fabric from my stash.  This fabric I purchased from EOS last year.  It is washed and ready to go.
More updates later.

KS 3127

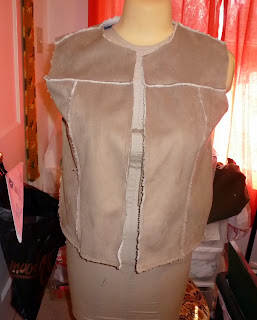
Here is the completed vest on Alma Marie.  It is still shedding and hopefully this will end soon.  I used lint remover wand and wiped all over the inside of the vest which removed quite of bit of loose fibers.  I had hoped that washing the fabric would have eliminated most of this.

Vest back

Vest front

Saturday, February 16, 2013

KS 3127 is finished

I completed the vest pattern-Kwik Sew 3127.  I don't have photos of the completed vest yet.  These will give you an idea of how this will look:
Front yoke and front/side front

Back yoke, center back and side back pieces stitched together


Friday, February 15, 2013

KS 3827

I finally found the time to take photos of the completed KS jacket
Back view

Side view

Front view
Hands in pocket view

Wednesday, February 13, 2013

Buttonhole with Foot Magic

I finally was able to stitch a buttonhole on the faux suede fabric.  I posted about my issues with getting the buttonhole to stitch on this fabric previously.  The Teflon foot was used throughout the sewing of this project but when it came to sewing a buttonhole it just would not work.

Using Foot Magic on the bottom side of the buttonhole foot, I was finally able to get a perfect buttonhole.  I have yet to sew the button on yet.  I have been under the weather with a cold and just have not felt like doing anything when I get home from work.

I made excellent progress with the KS vest pattern.  I just need to attach at the shoulders and side seams, topstitch all around  and I am done.  I used the overlapping seam method which allows enough of the wrong side to show. I will try to take some photos this evening.

I think I will either make some tops or sew some dresses next, I am thinking quick gratification right now.  I still want to make another jacket using Sewaholic pattern.  More later.

Sunday, February 10, 2013

Foot Magic and Patterns

The mailman delivered recent purchases.

In a previous post I mentioned Foot Magic.  This is a packet of 5 small pieces of stick on Teflon you can apply to various sewing feet to make them glide over difficult fabric.  Easy instructions to follow and will be trying on my buttonhole foot this AM so I can complete the KS jacket.

Foot Magic

I also received new patterns from the recent Club BMV sale.  I have to stay away from this site.

McCall's 6512McCall's 6650V1336V1340

Off to the sewing room now.  I cut out the KS vest pattern and that should be an easy garment to sew.  But first I am going to make that buttonhole.

Friday, February 08, 2013

In prep

The fabric did very well in the washer and dryer.  A lot of the loose fuzz was eliminated and the fabric is a tad softer which is okay by me.

I was out of town a few days this week for business travel.  I had so hoped to be able to visit a Hancock's Fabric store while traveling; it just did not happen.  Not that I don't have enough fabric or patterns on hand.  Actually was going to look at buttons and stock up on a few.

The fabric is laid out on the cutting table and the KS vest pattern is adjusted.  Hopefully this evening I will be able to cut out the vest and set up sewing machine.  Maybe even sew a little.

More later.

Monday, February 04, 2013

Preparing fabric for sewing

I decided to wash this fabric this evening.  DH is working late and I have time on my hand to do some sewing related things.  I cut a small square of this fabric yesterday and hand washed it and let it dry.  It did really well with no shrinkage.  I think the washing will get rid of all the loose fuzzy material.  They were all over me when I pulled out this fabric to plan the layout of the fabric.  

I really need to use of some of my fabric stash and this will get some wear during the cool February and March days, possibly into April.

KS 3172

I have had this pattern for several years and finally decided to make it.  I ordered faux shearling fabric from Nancy's Notions sometime last year.  It is washable in cool/cold water and can be dried using low temperature.  It sheds a lot right now and hoping after washing/drying that will be eliminated.

I made my usual adjustments to the pattern after pin fitting using medium in the upper body area tapering to large from bust down.  I did not have to make a FBA enough pattern ease with the large size.  I plan to make View B which in the sidebar photo is the brown colored vest.

More later.

Sunday, February 03, 2013

Perfect button, imperfect buttonhole

After a busy day grocery shopping and running all over the place trying to find other household goods, I was excited to get to sewing again.  I have the perfect covered button and only needed to make the perfect buttonhole on thick faux suede fabric.

I used a Teflon foot for the sewing of this jacket; worked great.  Then I changed to my sensor buttonhole foot and found in testing the right buttonhole that this was going to drag on the fabric and could not get a decent buttonhole.  I tried using the Teflon foot and though gliding over the fabric when attempting to sew the other side of the buttonhole, it got hung up every time after sewing the top bar tack part of the buttonhole.

I remembered that my machine had come with "self-adhesive" glide tape--Teflon tape.  It was perfectly cut to use on buttonhole foot.  Unfortunately the self-adhesive material was only working on one side not the other side.  Trying temporary spray to affix that one piece did not work well.  I test drove this and found it would not sew the buttonhole well as the piece just would not stay.

Another issue was the need to change the needle.  I then tried the Teflon foot again; no go.  So I turned to sewing sources and Google and found a product called Foot Magic.  To make a long story short, I ordered two packets at $5.00 a piece on Amazon and hopefully will arrive the latter part of next week.

So the jacket is almost complete.  I am now moving on to my next project, using some faux Sherpa fabric.  Normally I would move on to a quick project but why not continue on a roll of working with challenging fabric.  I am going to make a vest using Kwik Sew 3172.  I have traced the pattern pieces and plan to pin fit this afternoon and cut it out before stopping to watch the Super Bowl.  Neither team is "my" special team but I am pulling for the Ravens!!!

Saturday, February 02, 2013

Sewing tool

I unfortunately do not live in an area where I have a lot of places to buy buttons.  Over the years I have purchased buttons that appeal to me in colors that I think/know I will eventually use.  My button collection is no where near the level of my pattern/fabric collections--thank goodness!  I would have to move if so.

I bought a tool in November/December 2011 from Sew It Up website.  They were running a special and it was one of those impulse purchases. Scan forward a year plus and I find myself needing a button to go on a jacket and I cannot find the right blue button.  Thus I think that I will make a covered button and I realize that I have the perfect tool or think that I do.

I locate my i-Top tool that is still in the package and in the mailing envelope that it came in though it has been opened 'cause I did that when it arrived.  Also included with this package deal is snaps, buttons and badges that you cover with fabric or paper and turn them into usable objects.  I discover the perfect size button that I will cover with the jacket fabric and I am good to go.

Here is the i-Top tool

and a close up view
The left side (top area) is where you place the top part of the button.  The right side is where you will place a piece of the fabric you are going to use; you then press the tool together.  Fabric is now attached to button and the button is now in the right side of the tool.  You then turn the right part of the tool by lifting and turning toward you, cut off some of the excess fabric, then push remaining fabric over the underside of the button.  You then place the underside of the button (shank part) onto the left side of the tool, then turn the right side back and press the tool together until you hear a click.  You now have a perfect covered button. 

You pop the button out, easy to do as the pink pieces are sturdy, yet flexible rubber.
Here is a close up of the front and back sides of the button:

There is a nice set of tutorials at Imaginisce.  I assure you I am not affiliated with this company.  My impulse purchase has paid off and I see more covered buttons in my future as this is the easiest tool I have ever worked with to get this kind of result.  Off to sew a buttonhole and add the button.

August Sewing Simplicity 7295

 I am not doing well as a blogger. I have been working on this project since July 30. Today, I finally finished it. It has been a stop-and-g...